Can't see the region you're looking for? You can find a list of our global locations here
This fitting guide, whilst compiled to the best of our knowledge is for guidance only, and Altro cannot be held responsible for any faults which may occur. If in any doubt, contact the technical services department to answer any queries you may have. Tel: 01462 707600.
Altro Whiterock semi rigid extruded PVCu wall sheet can be used in hygienic environments and areas subject to wet usage. The walling system has excellent adhesion properties to all sound substrates used for internal wall construction. It is suitable for new and refurbishment building projects. A range of sheets are available in White, Satins, Decorative, High Gloss finish and the bespoke Altro Digiclad (Custom) range.
Altro Fortis Titanium semi rigid extruded PVCu wall sheet can be used in busy public areas subject to impact and scuff damage. The walling system has excellent adhesion properties to all sound substrates used for internal wall construction. It is suitable for new and refurbishment building projects.
The walling systems incorporate a range of colour coordinated jointing systems, including two part joint trims, flexijoint, welded and single part trims for use in secure environments.
AltroFix adhesives are supplied to fix all types of sheet.
Altro sanitary sealant are food-safe and available in co-ordinating colours.
Altro wall products:
Altro Whiterock Digiclad (Custom) - Custom print option utilising UV cured inks onto an Altro Whiterock sheet from a design or photographic image.
Altro Whiterock Whiteboard - Wall mounted note board to capture non-permanent ideas. Dry wipe clean for repeated use.
Altro Whiterock wall designs - Altro Whiterock wall sheet in a range of natural wood, metal, stone and linen designs.
Altro Whiterock Satins - 2.5mm PVCu sheet in a colourful, satin finish.
Altro Whiterock Chameleon - High gloss 2.5mm PVCu sheet for high-end public areas, durable and hygienic.
Altro Tegulis - Tile-effect wall panels with innovative etched grout lines.
Altro Fortis Titanium - 2.5mm PVCu textured sheet providing durable protection for walls, doors and corners.
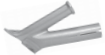
Altro Fortis corner protection - Ready-made piece for added protection along the wall’s vulnerable corner.
Altro Walls ShowerKit - A pre-packaged Altro Whiterock wall cladding system for shower, bath and ensuites.
Altro Whiterock White - Impact-resistant, impermeable, grout-free, easy maintenance 2.5mm PVCu sheet which is a hygienic alternative to ceramic tiles.
Altro Whiterock Splashbacks - Pre-cut or custom-sized hygienic alternative to tiles made from Altro Whiterock Satins or Altro Whiterock Chameleon sheets.
Sheets are available in a variety of sizes. Please refer to product data sheets for sizes. Altro Whiterock Digiclad (Custom) sheets are trimmed prior to preparation of pattern application.
The sheets are supplied with a protective film on the face which can be left in place until the area is ready for use. This also helps protect the new surface from dust while other trades are working in the area.
Altro PVCu wall sheets have a maximum working temperature of 60°C.
For areas that exceed these maximum temperatures, such as direct heat sources or where there is exposure to naked flames (examples being air fryers, heat vents, cookers, oven ranges, wall-mounted griddles etc.) it is recommended that stainless-steel sheets are used. Where installations of stainless-steel sheets are to be included, the stainless steel must extend at least 300mm beyond the heat source to ensure protection of these localised areas is maintained.
If a layout drawing highlighting areas where heat may be of concern can be provided, specific advice can be provided as to the best combination of materials to use.
On delivery, sheets should be checked for any possible faults prior to installation. Claims against guarantee for colour, batch or obvious material defects will only be considered if the wall sheets have not yet been installed.
Ensure that the material used in any one area is from the same manufacturing batch, and on large projects where multiple sheets are used, it is best practice to use sheets off of one pallet before moving on to the next numbered pallet.
All surfaces must be smooth, sound, dry and free of contamination. If necessary, the walls should be cleaned down prior to the Altro wall sheet installation, and primed using 10 parts water to 1 part PVA. - do not use Altro W165.
The working environment must also be clean and dust free. Failure to comply with these conditions will reduce the bond strength between adhesive and substrate, and may cause the sheets to de-bond.
The sheets can be fixed directly to most sound and dry substrates with AltroFix W139, two-part polyurethane adhesive.
Part A is a viscous cream coloured paste supplied in a plastic tub. Part B is a catalyst (hardener) supplied in a foil bag (separated within the tub).
Pour the liquid contents of the foil bag (Part B) into the plastic container holding Part A and mix thoroughly for approximately 2-3 minutes until a uniform consistency is obtained throughout.
A low speed electric drill with mixing paddle attachment should be used to ensure complete mixing.
Once mixed, the adhesive should be applied to the (pre-cleaned) back of the sheet with a 5mm x 5mm square notched trowel.
Before using this adhesive, users must refer to the SDS (Safety Data Sheet) for correct safety advice and carry out a COSHH (Control of Substances Hazardous to Health) assessment and risk assessment.
Always wear appropriate PPE (Personal Protective Equipment) and RPE (Respiratory Protective Equipment) when handling adhesives and ensure the area is adequately ventilated.
In the case of contact with eyes or skin, rinse immediately with plenty of water and seek medical advice.
As from 24 August 2023 adequate training is required before industrial or professional use.
The sheets can be fixed to most smooth, sound, dry and porous substrates with AltroFix W157 single part Acrylic water based synthetic polymer emulsion adhesive.
The adhesive is available in three tub sizes:
A low speed electric drill with mixing paddle attachment should be used to ensure the adhesive has a smooth creamy consistency for easier troweling.
Once mixed, the adhesive should be applied to the (pre-cleaned) back of the sheet with a 3mm x 3mm square notched trowel.
Note: AltroFix W157 is not suitable for fixing to non-porous substrates or for use in wet environments such as showers and wet rooms.
Before using this adhesive, users must refer to the SDS (Safety Data Sheet) for correct safety advice and carry out a COSHH (Control of Substances Hazardous to Health) assessment add and risk assessment.
Always wear appropriate PPE (Personal Protective Equipment) and RPE (Respiratory Protective Equipment) when handling adhesives and ensure the area is adequately ventilated.
In the case of contact with eyes or skin, rinse immediately with plenty of water and seek medical advice.
The sheets can be fixed directly to most sound and dry substrates with AltroFix W639, twopart MS Polymer adhesive.
The adhesive is available in one size:-
Part A is a viscous cream coloured paste supplied in a metal pail. Part B is a blue coloured catalyst (hardener) supplied in a foil bag (separated within the tub).
Pour the liquid contents of the foil bag (Part B) into the metal container holding Part A and mix thoroughly for a minimum 3 minutes until a uniform consistency and colour is obtained throughout.
A low speed electric drill with mixing paddle attachment should be used to ensure complete mixing. Scrape the sides thoroughly during this process. Care should be taken to avoid spillage when mixing, as staining of floor coverings may occur.
Once mixed, the adhesive should be applied to the (pre-cleaned) back of the sheet with a 4mm x 4mm square notched trowel.
Before using this adhesive, users must refer to the SDS (Safety Data Sheet) for correct safety advice and carry out a COSHH (Control of Substances Hazardous to Health) assessment and risk assessment.
Always wear appropriate PPE (Personal Protective Equipment) and RPE (Respiratory Protective Equipment) when handling adhesives and ensure the area is adequately ventilated.
In the case of contact with eyes or skin, rinse immediately with plenty of water and seek medical advice.
| Substrate | AltroFix W139 | AltroFix W157 | AltroFix W639 |
| Gypsum Board 12.5mm (e) | ✔ | ✔ | ✔ |
| Minimum 9mm WBP Plywood* | ✔ | ✔ | ✔ |
| Metal | ✔ | ✔ | |
| Ceramic Tiles (a) | ✔ | ✔ | |
| Plaster (b) | ✔ | ✔ | ✔ |
| Cement Render (b) | ✔ | ✔ | ✔ |
| Brickwork (b & c) | ✔ | ✔ | |
| Blockwork (b & c) | ✔ | ✔ | |
| Painted (d) | ✔ | ✔ |
(a) = Provided tiles are firmly bonded to the substrate and free from surface contamination, grease etc:
(b) = Surface should be dry. If in doubt test with a Protimeter, which should give a maximum reading of 16% wood moisture equivalent (WME). Plastered surfaces must be sealed with diluted PVA (or similar) before installation of the Altro wall sheet.
(c) = Brickwork and Blockwork should be of good quality and joints should be flush and dry.
(d) = A bond test is advisable to check adhesive does not react with paint.
(e) = AltroFix W157 should not be used for bonding to moisture resistant substrates
* = Plywood must comply to
Glue bond quality class 3 ‘s’ grade
Altro recommends the PVCu wall sheets are installed at approximately the same ambient ‘service temperature’ at which the area will be used when commissioned.
A minimum temperature of 14°C/57°F is recommended for all installation areas.
AltroFix adhesive must never be used below +5°C.
Sheets should stored flat and be pre-conditioned for up to 24 hours to attain the ambient room temperature prior to the installation.
The sheets must be stored on a level flat surface off the ground (risk of condensation on the sheets if stored on damp surfaces).
Storage on un-even surfaces could cause the sheets to distort prior to installation.
In general, the main tools required are similar to carpentry hand tools. Below is a list of tools that you may find an advantage to have for the installation.
Ensure all electrical equipment is PAT tested.
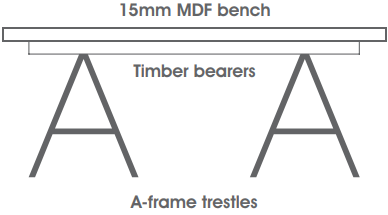
You will also need a 2.5 x 1.22m workbench made from 15mm MDF board (or similar), with support bearers to prevent the MDF from bowing in the middle. The bench provides an excellent work surface for the sheets which are 1.220m x 3.000m.
Apart from the normal health and safety rules employed within the construction industry, the following points should be noted:-
Before starting work, users must refer to the relevant MSDS (Material Safety Data Sheet) for correct safety advice and carry out COSHH (Control of Substances Hazardous to Health) assessments where necessary. Contact Altro on 01462 707600 for further advice.
Please ensure you follow the installation guidelines carefully to ensure best results
Set up a ‘workstation’ in close proximity to the area to be clad. A minimum area of 4m x 3m will be required to set up your work bench area.
Adjacent to the workstation, set up a ‘glue-station’, where all the mixing of adhesive takes place. The floor area in this location needs to be protected with cardboard (or similar) to prevent splashes of adhesive getting onto the floor.
If an existing or new floor has been laid prior to the installation of the wall sheets, it is essential to protect the floor around the work bench and the ‘glue-station’ where adhesive may get spilt.
The ‘glue-station’ is also where the trowels and mixing paddles are cleaned regularly to prevent a build up of excessive adhesive on the tools.
Please note: If the adhesive gets on the floor and is allowed to set, removal can be difficult, if not impossible. Therefore if a spillage or splashes occur, they should be wiped up immediately.
Once all preparation has been carried out, walls are cleaned and free from dust, any possible contamination from grease (in kitchen and shower areas) has been removed, the datum line and ‘tape primer’ (Altro W165) have been applied, you are now ready to install the Altro PVCu wall sheets.
Before using this adhesive, users must refer to the SDS (Safety Data Sheet) for correct safety advice and carry out a COSHH (Control of Substances Hazardous to Health) assessment and risk assessment.
Always wear appropriate PPE (Personal Protective Equipment) and RPE (Respiratory Protective Equipment) when handling adhesives and ensure the area is adequately ventilated.
In the case of contact with eyes or skin, rinse immediately with plenty of water and seek medical advice.
Altro Whiterock (REF: W103/104, W136/137, W140/141, W160/161), WDS25 and WDS30. Altro Fortis Titanium (REF: FT/XXX).
Altro recommends, wherever possible, to use a thermoformed internal / external corner detail when installing the sheets. This is achieved by heating the sheet on a thermoformer unit and manually forming the sheet to the desired angle.
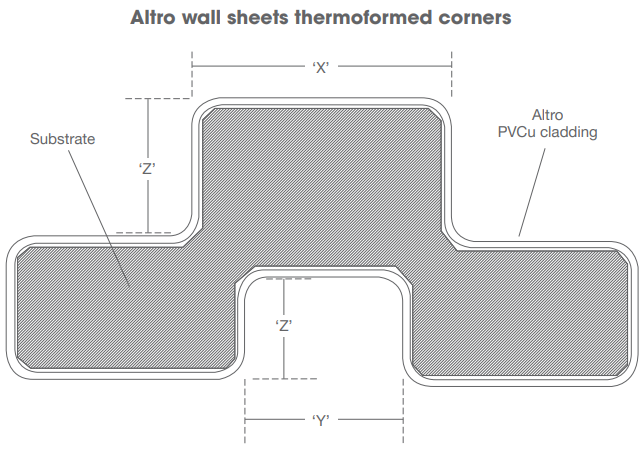
‘X’ - External to External corners = + 8mm
‘Y’ - Internal to Internal corners = –8mm
‘Z’ - Internal to External / or External to Internal corners - Is the same measurement as substrate
All measurements to be marked on ‘face’ of PVCu sheets and taken from outside of previous corner
Corner protectors are manufactured in coordinating colours to match the Altro Fortis Titanium range of cladding systems. When ordering colour coordinated corners, remember to include the ‘part number’ with the specific ‘colour reference number’ on your order
Example: FT/213/E75xE75 – This is a corner protector in colour Kingfisher.
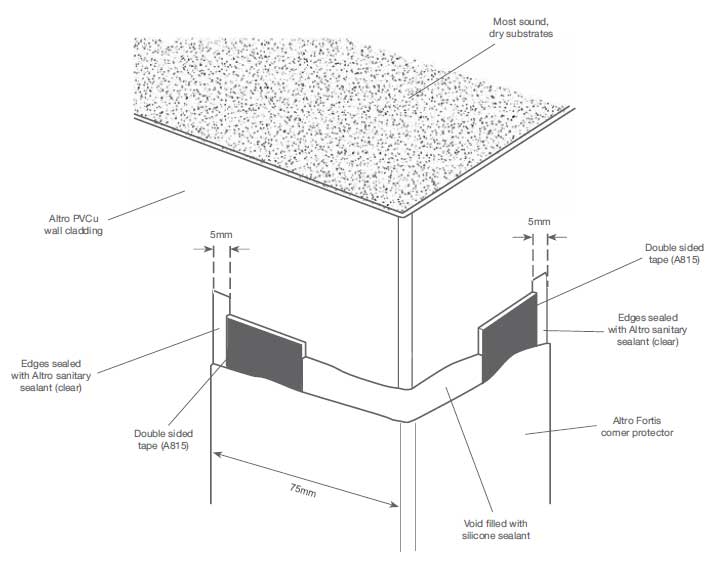
If specified, or specifically recommended by the client, Altro Fortis Titanium panels can be installed with an Altro sanitary sealant joint detail.
Substrates - when installing Altro PVCu sheets with welded joints, it is imperative the substrate is to a very high standard. Surfaces should be true and level to + or – 2mm over a 3m straight edge. Recommended substrates include plasterboard, plywood*, finishing plaster and most types of sand & cement render. We recommend all plastered surfaces are sealed with Unibond PVA sealer (or similar) diluted 1:10 parts water before fitting sheets.
Planning layout - when planning the layout of the sheets it is important to minimise the number of joints in the walling system. Ensure joints do not fall too close to corners. We suggest joints should not be formed any closer than 300mm from a corner. This will avoid any possible risk of mis-alignment between the joint when the next sheet is fitted.
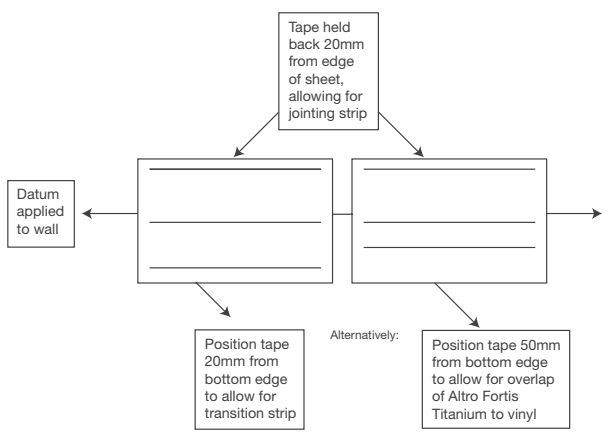
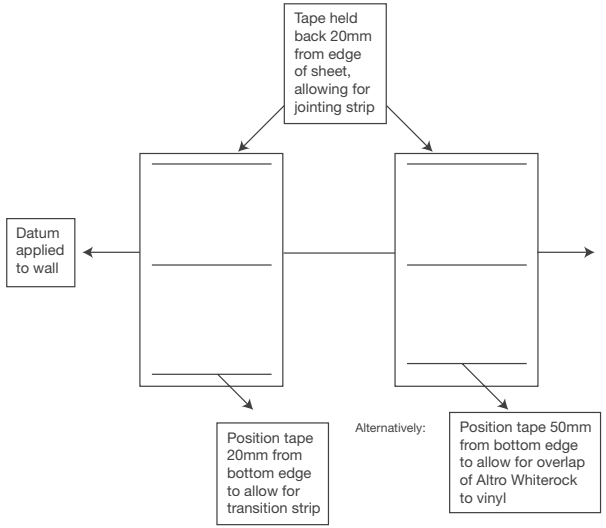
Preparing the joint - Before installing the sheets, you must fit the white ‘Foam Double Side Tape” (A915) to the substrate at the centre point where the two sheets meet. The double side tape is impregnated with a ‘contact adhesive’. Therefore, all substrates must be primed before fitting the tapes. The primer is only required where the 50mm wide tapes are to be fitted.
Sheet preparation - ensure all sheet edges (where joints are to be formed) are clean, smooth, true and level.
Always inspect new sheet edges are undamaged or scored. If necessary, cut and plane to a square edge.
Check there are no ‘fines’ left on the edge of the sheet. These ‘fines’ could burn when hot welding the joint and will leave a blemish which can not be removed from the joint.
When preparing the fitting of the sheet, always ensure there is an adequate gap (2-3mm) between the sheet and any rigid abutments (ceiling, windows, doors, services etc) to allow for expansion.
These ‘isolation’ joints must be sealed with Altro sanitary sealant.
Application methods - after priming and fitting the Foam Double Side tapes, leave the protective top film in place (this will be removed at a later stage).
Once the sheets have been prepared and dry fitted to check everything is correct, apply the adhesive to the back of the sheet in the normal way. Mark a line 25mm in from the sheet edge and apply the adhesive to this point, this ensures full coverage up to the tape applied to the substrate. Failure to apply the adhesive to meet the tape may lead to excessive sheet movement once installed.
Install the sheet in the normal way, ensuring the sheet is temporarily supported on timber blocks (or similar) to prevent slipping.
Check the sheet is aligned with the datum line before rolling the sheet to achieve a transfer of the adhesive to the substrate. When rolling the sheet, start in the middle and work outwards. At this stage do not roll right to the edge where double side tape is located.
Once the sheet has been rolled (almost to the edge), carefully cut down the edge of the sheet where the tape is located, to cut through the protective top film.
Carefully ease out the edge of the sheet to facilitate the removal of that half of the protective top film. Once this has been removed, press the sheets firmly onto the tape to achieve a full bond.
Finally, complete the full rolling of the sheet right up to the edge to ensure good transfer of the adhesive.
Make sure the exposed edge of the sheet is clean and free of any adhesive residue. If necessary, clean thoroughly before the adhesive cures.
Prepare the next sheet in the same way as described above. Before fitting this sheet you must fit a series of “spacer pins” against the edge of the previous sheet. This is to provide the correct ‘gap spacing’ between each sheet. The spacer pins should be 2mm thickness. Do not exceed 2mm thickness.
Fit the next sheet as described above, ensuring the sheet is butted tightly to the spacer pins.
Once the sheet has been rolled almost to the edge, remove the spacer pins and then remove the final part of the double side tape protective cover. Press the sheet firmly onto the foam tape and then complete the rolling of the sheet.
Check all edges are clean and free of adhesive residue.
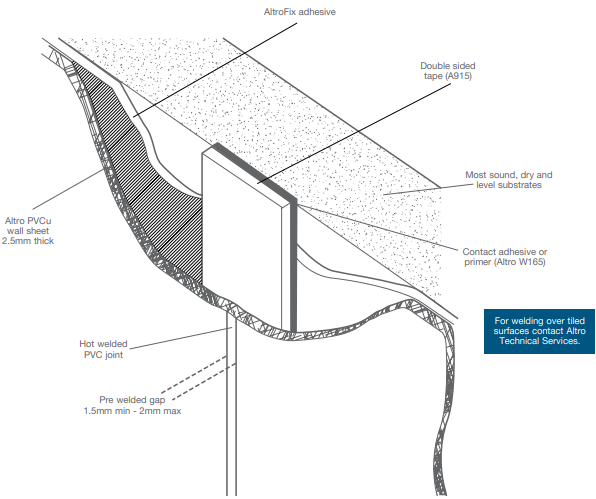
Once the installation of the sheets is complete, you are then ready to weld the joints. On larger jobs, you can weld the sheets ‘as you go’. However, we recommend welding does not take place until the adhesive has completely set up. (Usually the next day).
Hot welding - firstly, ensure your weld rod and the joint gap to be welded is clean and free of dust and contamination.
The hot welding technique used to weld Altro PVCu sheets is basically identical to that used in vinyl floor laying. The same type of tools and welding gun can be used. (See attached tools list). A Leister 5 mm round speed weld nozzle with small air slide (105.433) MUST be used for welding all Altro Whiterock wall designs installations - see separate welding instructions for Altro Whiterock wall designs.
The Altro ‘welding rod’ is also very similar to that which is used in flooring.
Whilst most floor layers use the large ‘Leister’ Hot welding gun, this can be slightly cumbersome and heavy in the hand when welding 3 metres up a ladder.
The preferred welding gun is the ‘Leister’ Hot-Jet “S” welding gun, which is smaller and more compact.
The weld rod is passed through a standard 5mm ‘speed weld nozzle” which softens the weld rod and sheet edges simultaneously to fuse the materials together under heat.
The temperature of the weld gun can be regulated and the settings depend on the speed at which you travel along the sheet.
This is something each individual must practice to ascertain what suits your method of working.
In most floor laying work the typical speed would be approximately 2 metres per minute. However, this is not always practical when working vertically, so you must practice to gain experience of different situations.
Trimming off - this is often the part of the job which can be most difficult. Unlike flooring, you are welding a plain, smooth wall finish, which can highlight any imperfections in your work.
Whilst many fitters choose to use their ‘own’ pre-fabricated trimmers, at the end of the day – you need to have a trimming tool that you are confident in using and practice extensively with to get the live jobs right.
In our opinion, the range of trimming tools currently available to the flooring trade will achieve good results if care is taken.
After completing the welded joint you should pre-cut the joint, the Mozart trimming knife is the preferred knife of most fitters.
Pre-cutting must be done by using the ‘trimming guide’ and spatula to take off approximately half of the weld rod. This allows the weld rod to ‘settle’ and will prevent sinking into the joint once the rod has cooled.
During this process, apply a liberal amount of Altro ‘Antistatic solution’ sprayed on to the joint before any trimming takes place. This will reduce any friction between the cutting blade and the sheet and minimise the risk of scratching the sheet.
After pre-cutting the weld rod, allow the rod to cool down sufficiently before completing the final trimming.
Once the rod has cooled down (cold) you can commence final trimming with the spatula (or your personal trimming tool).
Take care not to scratch or damage the surface of the wall sheets while undertaking this final part of the operation... “Practice makes perfect”.
The technique used to weld Altro Whiterock wall designs is different to the one used to weld standard Altro Whiterock. Installers must read these instructions fully before commencing to weld Altro Whiterock wall designs sheets and it is strongly advised to carry out a test weld before welding the final installation.
Specialist tool - A Leister 5 mm round speed weld nozzle with small air slide (105.433) MUST be used for welding all Altro Whiterock wall designs installations.
Preparation - Ensure all sheet edges (where joints are to be formed) are clean, smooth, true and level. Always inspect new sheets and ensure the edges are undamaged. Damaged edges will need re-trimming. Do not bevel, profile or chamfer the edges of the wall designs sheets at seam locations. Chamfering the edges will expose the base colour of the sheet. When hot welding this could leave the exposed sheet being visible on the finished detail and make a welded joint more challenging to achieve an aesthetically pleasing seam. Check there is no debris left on the edges of the sheet. Any debris could burn when hot welding the joint and will leave a blemish which cannot be removed. When fitting the sheet, always ensure there is an adequate gap (2 mm) between the sheet and any rigid abutments (ceiling, windows, doors, services etc.) to allow for expansion. Clean both the seam area and the weldrod prior to welding.
Heat Welding - Ensure the welding equipment is clean especially the nozzle which may contain debris and carbon build up. The use of a wire brush and pipe cleaners will maintain the nozzle. A Leister 5 mm round speed weld nozzle with small air slide (105.433) must be used for welding all Altro Whiterock wall designs installations. The speed required to weld Altro Whiterock wall designs may be different compared to a standard Altro Whiterock sheet due to the foil used which gives the design. As a result it is essential that the correct welding speed is achieved on practice sections using off-cuts of the sheet prior to attempting an initial live weld. This will allow the installer to gauge the correct speed and heat of the welding gun to ensure acceptable weldrod adhesion and help eliminate any potential burning of the sheet. Each site will require new settings for the weld gun which depend on site electrical supply. Check for proper fusion of the weld by trying to roll the bead left to right with your finger after it has been welded. Pulling on the end of the weldrod will be a good indicator that you have successfully fused to the sheets. The temperature of the weld gun can be regulated, and the settings depend on the speed at which the gun is pulled along the sheet. This is something each individual must practice to ascertain what speed best suits their method of working. Care must be taken not to scorch the sheets, as this will be extremely difficult to repair.
Trimming off excess weldrod - When trimming the weldrod two passes are key to the process to ensure a flat weld. Choice of tools to trim the weld are installer lead, but care must be taken all chosen tools are free from rust and are smooth. Failure to follow these guidelines could result in surface defects alongside the joint. The first pass should be done while the weldrod is warm. Spray a soapy water solution or Altro anti-static solution to the sheet along the weld to help lubricate the trimming knife, blade and sledge, if using the Mozart trimming tool leave a final cut thickness of 0.5 - 0.7 mm. Once the rod has cooled down, final trimming can commence with a trimming knife and soapy water.
Take extra care not to scratch or damage the Altro Whiterock wall designs surface while undertaking this final part of the procedure. When heat welding, a small mock up must be done and inspected for the client’s approval before proceeding with the entire installation.
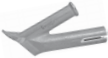
Trimming off Installation tools and equipment for welded Altro PVCu wall sheets sheets
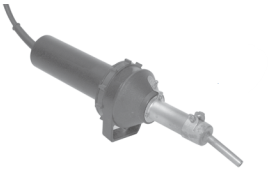
Light and compact welding gun for walls and other detailed welding work.
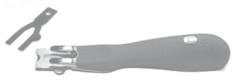
Used for trimming of cold weld.
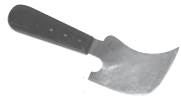
Used for flush trimming of cold weld.
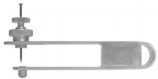
For exact scribing of one sheet edge to the next sheet.
For welding PVCu wall PVCu wall sheets. The hot air outflow is very tight and directed into the groove.
Used with the quarter moon knife for pre-trimming of the weld rod.


Multipurpose gouge paired with either round or flat blades. To be used when the weld rod is cold.
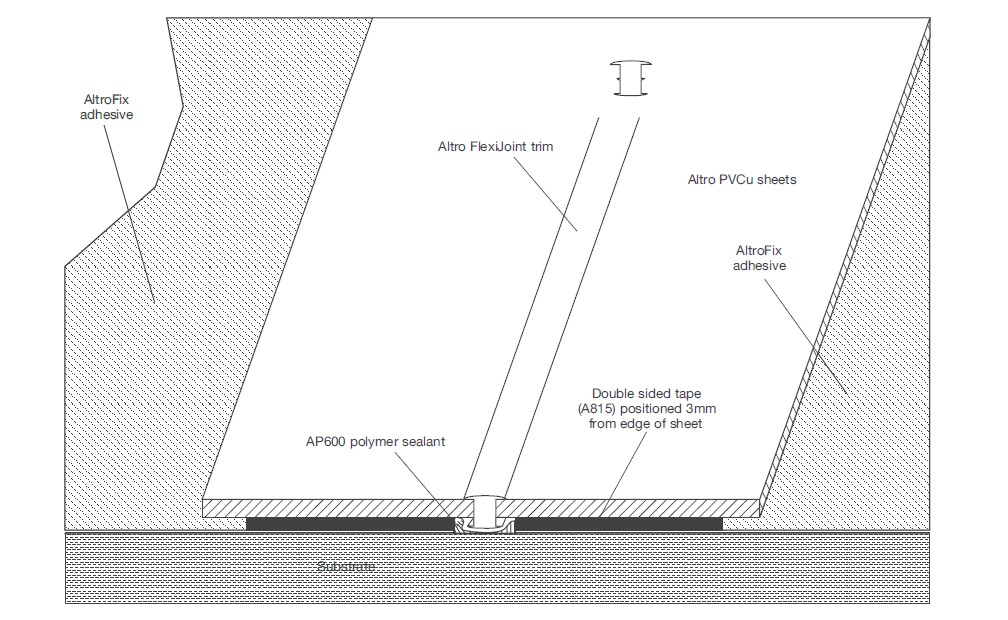
Substrates - when installing Altro sheets with the PVC FlexiJoint profile, it is imperative the substrate is to a very good standard.
Surfaces should be true and level to + or – 3mm over a 2.00m straight edge
Recommended substrates include plasterboard, plywood, finishing plaster and most types of steel trowelled sand and cement render.
We recommend all plastered surfaces are sealed with Unibond PVA sealer (or similar) diluted 1:10 parts water before fitting sheets and left to dry before installation process.
Planning layout - when planning the layout of the sheets it is important to minimise the number of joints in the walling system. Ensure joints do not fall too close to corners. We suggest joints should not be formed any closer than 300mm from a corner. This will avoid any possible risk of mis-alignment between the joint when the next sheets are fitted.
Preparing the joint - before installing the sheets, plan out where the joints will fall in the installation operation. Mark a vertical line on the substrate to indicate the centre of the joint. You must then prime the substrate either side of the vertical line with Altro W165 primer, using a small paint brush.
Sheet preparation - ensure all sheet edges (where joints are to be formed) are clean, smooth, true and square.
Always inspect new sheet edges to see they are not damaged or scored. If necessary, cut and plane to a clean square edge.
Check there are no ‘fines’ left on the edge of the sheet.
Altro PVCu sheets can also be cut with a circular saw (with fine tooth cutting blade), or a router (with a straight edge router bit suitable for plastics and laminates).
When preparing the fitting of the sheet, always ensure there is an adequate gap (2-3mm) between the sheet and any rigid abutments, (ceiling, windows, doors, services etc) to allow for expansion.
The edges of the sheets must be chamfered to the front and back this will allow the FlexiJoint to be inserted into the produced gap, failure to manufacture the chamfered edges could prevent the FlexiJoint being inserted smoothly.
These ‘isolation’ joints must be sealed with Altro sanitary sealant after completing the installation.
Once the sheet has been prepared for fitting, apply Altro double sided tapes (A815) to the back of the sheet approximately 3mm in from each edge which forms the joint for the PVC profile.
Adhesives - Altro recommends AltroFix W139 adhesive for all FlexiJoint installations.
Note: AltroFix W157 acrylic adhesive can also be used; however, this must be applied with a 5mm x 5mm square notch trowel, (increasing consumption).
Application methods - once the first sheet has been prepared and dry fitted to check everything is correct, fix the double side tapes (A815) and leave the protective top covers in place, (these will be removed later).
Apply AltroFix W139 adhesive to the back of the sheet in the normal way. Trowel the adhesive up to the edge of the double side tapes.
Install the first sheet in the normal way
Check the sheet is aligned with the datum line before rolling the sheet to achieve a transfer of the adhesive to the substrate. Whilst the sheet is held in situ carefully ease the sheet edge away and remove cover tape, once complete remove other tape edge. Roll the sheet again to ensure adhesive transfer.
When rolling the sheet, start in the middle and work outwards.
Prepare the next sheet exactly the same as before. Dry fit this sheet to check the joint between both sheets is true and parallel. Once this check has been completed, temporarily fix three metal spacer bars (available from Altro Walls) tight against the leading edge of the previous sheet – (position at the top, middle and bottom). Altro ‘spacer bars’ are manufactured with the precise measurement to form a 3.4mm gap between the sheets.
Apply the double sided tapes and adhesive as previously described. Leave the protective cover on the strip of double sided tape which fits against the metal spacer bars, (it will be removed later). This will allow for easier fitting and manoeuvrability when butting up tight to the metal spacer bars.
Install the sheet in the normal way, ensuring the edge is fitted against each of the metal spacer bars.
Once the sheet has been fully rolled, remove the metal spacer bars. Carefully ease out the edge of the sheet to facilitate the removal of the protective cover from the back of the double sided tape. When this has been removed, press the sheet firmly back onto the substrate to achieve a full bond.
Finally, complete full rolling of the sheet right up to the edge to ensure good transfer of the adhesive.
Make sure the exposed edges of the sheet are clean and free of any adhesive residue.
Repeat this process for all subsequent sheets.
Note: Altro Walls recommends the FlexiJoint profile is inserted and fitted to the joint as work progresses.
(This will avoid any risk of the joint closing up as the adhesive cures).
Installing the FlexiJoint PVC profile - prior to fitting the Altro FlexiJoint PVC profile, clean and prime the joint. Apply a uniform bead (2mm max: thickness) of Altro AP600 polymer sealant to the substrate in between the joint gap.
Caution: Do not overfill this joint with AP600 sealant, as this will prevent the FlexiJoint profile from seating correctly into the gap.
Cut a suitable length of the FlexiJoint profile (allow for trimming off) and then press firmly into the joint gap.
Once the profile has been fully fitted to the joint, roll the joint thoroughly with a small hand roller, (wooden wallpaper seam rollers are ideal for this task).
Finally, trim off the surplus as required.
Door heads, window heads and sill sections - door heads, window heads and sill sections need to be carefully scribed and cut to adjacent sheets to ensure a gap of 3.4mm is maintained for the FlexiJoint profile.
Floor to wall joint detail - the Altro FlexiJoint profile can be used in conjunction with all current types of Altro PVCu transition trims.
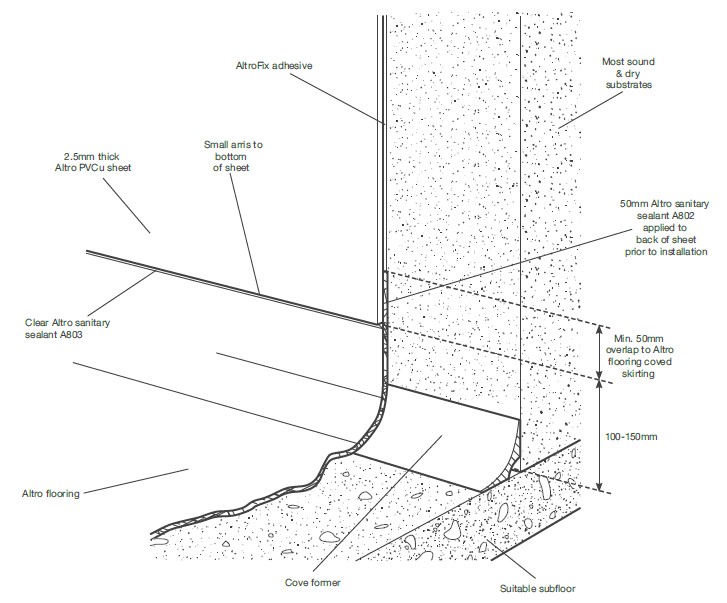
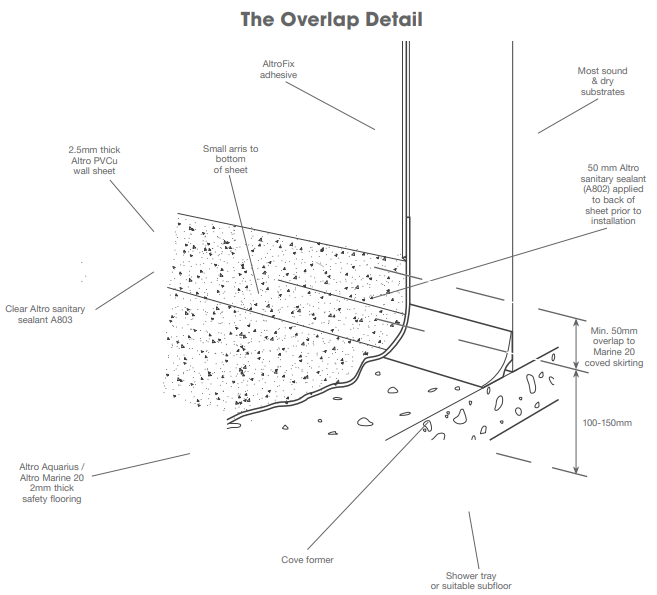
The most aesthetically pleasing method, (where appropriate), is to opt for the standard 50mm ‘overlap’ detail, which has the Altro PVCu sheet fitted over the top of the self-coved PVC floor finish.
Internal and external two-part corner sections are manufactured in coordinating colours to match the range of Altro walling systems. When ordering colour coordinated corners, remember to include the ‘part number’ with the specific ‘colour reference number’ on your order. F837 / F836 only refer to ‘White’ corner sections. For all other colours, add a suffix to the specific part number with the correct ‘colour reference number’.
Example: F837/25/41 – This is an Internal corner section, 2.5m length, in colour Linen.
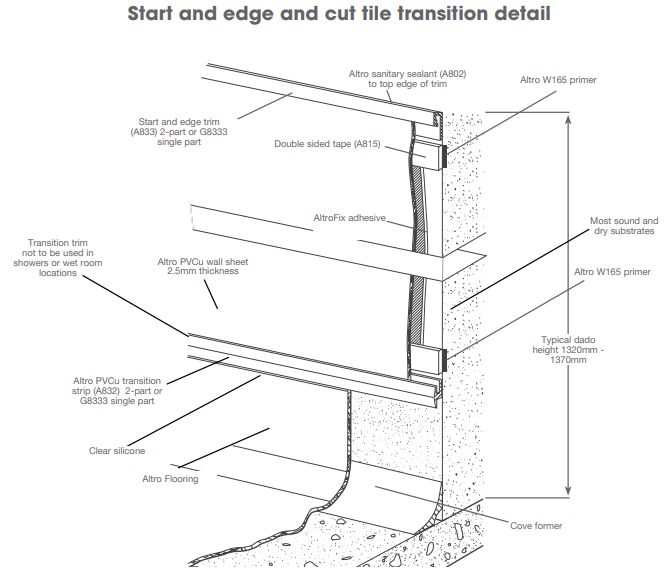
Altro A833 is a two-part (snap-on) PVCu start and edge trim, which is generally used to close any exposed edges (i.e. top or side edges) of the Altro PVCu sheet. This is usually fitted when the sheet is installed lower than the ceiling line, or when the sheet terminates along a wall before reaching a corner or abutment.
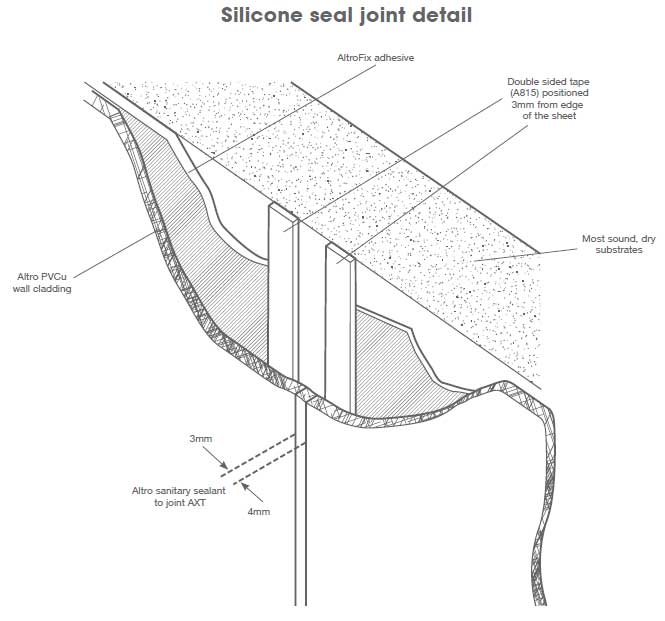
If specified, or specifically recommended by the client, Altro wall sheets can be installed with a silicone joint detail.
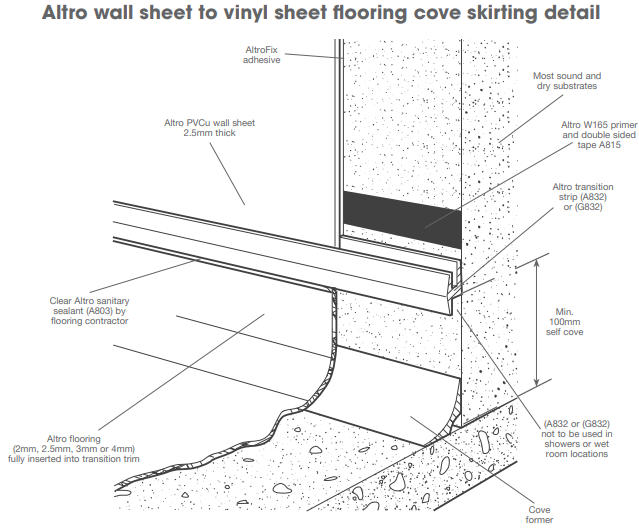
The Hidden Transition trim allows the Altro wall sheet installation first and the flooring to be fitted at a later stage.
The Trim is situated behind the Altro wall sheet (see diagram WHTT2 and WHTT3) enabling the Altro flooring to run up behind the Altro wall sheet and create the overlap detail, another advantage is it enables easier removal and replacement of the flooring from behind the sheet.
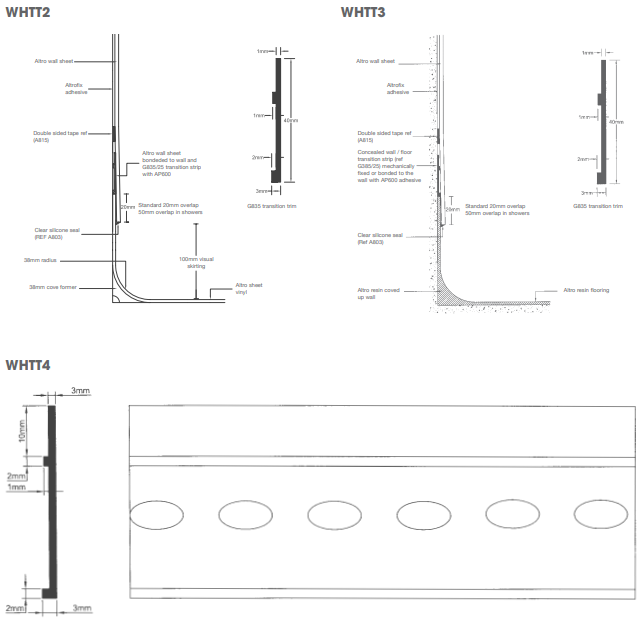
The hidden transition strip has been designed to maintain the overlap detail when replacing flooring without the need to
replace the sheet, for installation guidance contact the Altro technical team on 01462 707600.
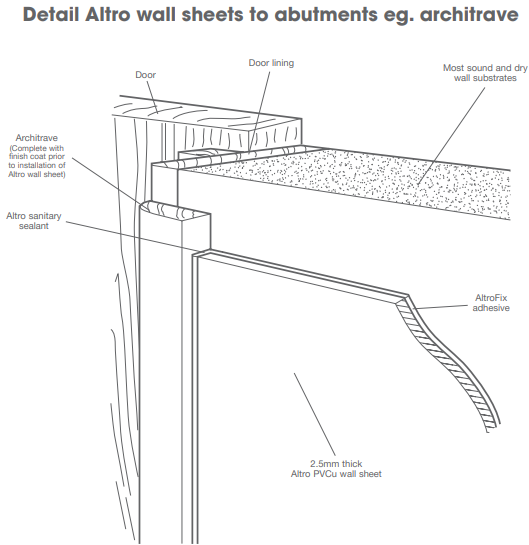
Altro wall sheets should be fitted to within 3mm of rigid abutments such as window frames, door frames, architraves, ceilings, quarry tile skirtings etc. Thus ensuring a 2-3mm gap at these points.
This will allow for expansion and contraction to take place.
Prior to sealing the joint, clean the sheet and adjacent surfaces.
All ‘isolation’ joints must be sealed with colour coordinated Altro sanitary sealant.
Once all sheets and joint strips are installed and silicone has been completed, remove the protective film and clean all surfaces down with Altro antistatic solution (A809). This is required as the sheet may have static build up and any dust in the atmosphere will adhere to the surface of the sheet.
Regular cleaning using a soft cloth and suitably diluted mild detergent is all that is normally required. For heavy grease contamination use Altro 44 alkaline cleaner (or similar). For stubborn marks use a non-abrasive domestic type cream bath cleaner.
When cleaning the Altro wall sheet surface, we recommend the temperature of water does not exceed 60º Centigrade.
If cleaning with hot water lance, temperatures must be regulated to a maximum of 60º Centigrade and not to be localised.
Do not use cleaning materials of an abrasive nature.
Cleaning cards are available on request.
NOTE: “Altro Ltd” (“Altro”) endeavours to ensure that advice and information given in Product Data Sheets, Method Statements and Material Safety Data Sheets (all known as Product Literature) is accurate and correct. However, where Altro has no control over the selection of its products for particular applications, it is important that any prospective customer, user or specifier, satisfies him / herself that the product is suitable for the intended application. In this process, due regard should be taken of the nature and composition of the background / base and the ambient conditions both at the time of laying / applying / installing / curing of the material and when the completed work is to be brought into use.
However, as site conditions and the execution of the work are beyond our control, we accept no resultant liability.
Altro’s policy is one of continuous research and development and we reserve the right to update our products and information at any time without prior notice.