United Kingdom

United Kingdom

Construction
Transport
Construction
Transport

Samples basket

Altro Tegulis installation guide


Last edited:September 2021


Read all instructions before beginning the installation.

Storage and handling

All Altro materials, panels, adhesives, sealants and all accessories must be stored between 14°C – 27°C and acclimated to the room which they will be used in at least 24 hours before the installation is to take place. Altro Tegulis panels must be stored on a level flat surface above the ground (risk of condensation on the panels if stored on damp surfaces). Standing the panels against a wall on there side or on uneven surfaces can distort or damage the edges of the panels.

Suitable substrates

Note: Check adhesive data for specific requirements

  • Plasterboard
  • Cement board
  • Plywood*
  • MDF panels that meet local building codes
  • Existing ceramic tiles that are securely bonded (missing or loose tiles must be removed and the appropriate patching compound must be used to fill the void such as a moisture-resistant type)

All substrates must be smooth, sound, primed and dust-free.

*Plywood must comply to - EN 13986: 2004, BS EN 636: 2003, BS EN 315, BS EN 314-2, Glue bond quality class 3 ‘s’ grade

Required tools

  • Level(s)
  • Saw(s) with fine tooth blade(s)
  • Hole saw
  • Jig saw
  • Low-speed mixing drill and epoxy mixing paddle
  • Tape measure and pencil
  • Small mastic gun
  • File(s) to remove sharp edges
  • Trowel
  • Three-wheeled laminate style hand roller
  • Spray bottle for anti static cleaning solution

Wall substrate preparation

All surfaces must be smooth, sound, dry, and free of contamination. Check walls for flatness especially at seam location(s), make sure seam area is 100% flat to ensure proper fitting for a successful installation. Priming of dusty and overly absorbent surfaces may be necessary. Existing wall tiles must be cleaned to remove soap residue and contaminants, rinsed with clean water and allowed to dry. Do not use solvents to clean substrate as this could cause a bonding failure. Any loose tiles should be fixed or made sound.
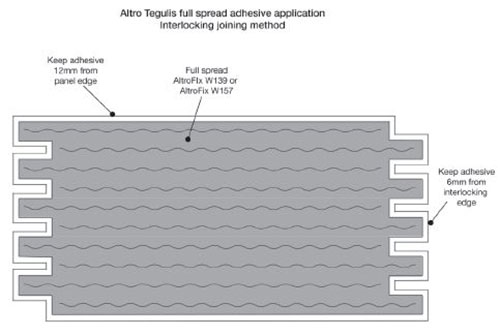
Adhesives

AltroFix W157
Water-based acrylic adhesive is suitable for surfaces in dry, climate controlled areas and may only be used with absorbent surfaces.

AltroFix W139
Two-part polyurethane adhesive suitable for wet areas and for all absorbent and non-absorbent surfaces.

Altro Sanitary Sealant
Altro sanitary sealant is a non-toxic, solvent-free, low modulus, multipurpose, one component sealant that is especially formulated for all types of sanitary applications and rooms with high humidity such as bathrooms, kitchens, as well as cold storage areas.

Recommended trowels
Only use approved adhesives and trowels recommended by Altro. Consult adhesive label for additional information. A 3mm x 3mm square notched trowel is recommended for use with AltroFix W157 and a 5mm x 5mm square notched trowel is recommended for use with AltroFix W139.

Half-lap joing method

Note: Altro Tegulis half-lap panels are suitable for both wet and dry environments. AltroFix W139 must be utilised in wet environments regardless of the substrate.

For wet areas only: Internal corners: apply a 2mm bead of Altro sanitary sealant to the substrate vertically on both sides where the sheets meet in the corner before placing the wall sheets. After installation, apply a bead of colour coordinated Altro sanitary sealant in the corner to cover the join.

  1. In pencil, apply a datum/level line horizontally on the substrate, this will help when measuring for cutting and aligning the panels to match up the grout lines. Mark the protective film of the panels with the same datum line measurement that corresponds with the line you drew on the substrate. This will aid in matching up to the datum line on the substrate during installation.
  2. Start with the bottom panel of the back wall, measure, cut and dry fit. Leave a (2mm) gap at perimeter edges, penetrations and abutments to allow for expansion of the panels.
  3. Cut and dry fit the top panel and check alignment with bottom panel. Leave a (2mm) gap at perimeter edges, penetrations and abutments to allow for expansion of the panels.
  4. Clean the back of the panels to remove dust and contaminants.
  5. If using AltroFix W139 two-part adhesive, careful planning must take place and both top and bottom panels must be cleaned and ready to be installed simultaneously, as the working time of AltroFix W139 is approximately 30 minutes once it is mixed.
  6. Apply appropriate adhesive on the back of the panel keeping adhesive 12mm maximum away from the edges, in this 12mm gap apply a bead of sealant to the perimeter of the sheet. Adhesive selection and trowel notch has been determined by substrate and environmental conditions of the application.
  7. Install bottom panel ensuring it is aligned with the pre-established datum/level line. Once in place, use a three-wheeled laminate roller ensuring 100% transfer of adhesive to the substrate.
  8. Apply a 2mm bead of Altro sanitary sealant to the half lap joint locations of the installed bottom panel. The Altro sanitary sealant must be applied above the visible seam so as not to seep out on to the surface of the panels.
  9. Apply adhesive to the back of the top panel.
  10. Align the top panel to the bottom panel by initially holding the top panel with a slight angle away from the substrate. Place seam edge onto the bottom panel seam avoiding the Altro sanitary sealant. Once in place gently bring the top panel towards the substrate, press home ensuring the seam edges of both panels are tight and no adhesive seeps through.
  11. Using a three-wheeled hand roller, roll the panel in both directions to ensure proper transfer is made to the substrate. Immediately clean up any excess adhesive using Desolvit wipes.
  12. For the sidewalls, measure and cut while using the datum line to ensure the grout lines match up. Dry fit each panel to check for fit and alignment. Remember to leave a 2mm gap around the perimeter, penetrations and abutments to allow for expansion.
  13. Again, have both side panels cleaned and ready to install simultaneously when working with AltroFix W139 two-part adhesive.
  14. Follow the above instructions for installing the side panels.
  15. Once all the panels have been installed apply a bead of Altro sanitary sealant along the inside corners, abutments, penetrations and any exposed edges.
  16. If required for the side panels, there are the options of a two-part start and edge trim A833 or the one-part start and edge trim G833.

Interlocking joining method

Note: Altro Tegulis interlocking joining panels are not recommended for wet environments.

  1. Predetermine the best layout to minimize waste and best location(s) for interlocking seams.
  2. In pencil, apply a datum/level line horizontally on the substrate; this will help when measuring for cutting and aligning the panels to match up the grout lines. Mark the protective film of the panels with the same datum line measurement that corresponds with the line you drew on the substrate. This will aid in matching up to the datum line on the substrate during installation.
  3. Start by measuring the first panel using the datum line as a reference for cutting around penetrations, abutments and overall length of panel(s). Cut panels, and a best practice is always dry fit the panels and make adjustments if necessary before applying adhesive to the back of the panels. Leave a 2mm gap around the perimeter and around all cut-outs to allow for the expansion of panels.
  4. Clean the back of the panel to remove dust and contaminants.
  5. Apply the adhesive to the back of the panel, including the interlocking joint, keeping the adhesive 12mm away from the panel edges to avoid adhesive seeping out of the seams. Install the panel ensuring it is aligned with the pre-established datum/level line. Clean any excessive adhesive up immediately using Desolvit wipes.
  6. Once in place, use a three-wheeled laminate roller to roll the panel in all directions to ensure 100% transfer of adhesive to the substrate.
  7. Do not allow excess adhesive to remain in the seam interlocking area if the next panel will not be installed within thirty minutes as it will harden and could create an uneven seam. Excessive adhesive on the wall substrate must be removed using a small putty knife or equivalent.
  8. Apply a bead of colour coordinated Altro sanitary sealant to the edges of the interlocking joint where the next sheet will meet this sheet, and wipe clean any excess sealant that seeps out of the joint.
  9. Continue measuring and trimming/cutting adjacent panels where required and leave a gap of 2mm around the perimeter, penetrations and abutments for expansion of the panels. It’s always a best practice to dry fit the panels to ensure a good fit and taking care with the interlocking edges.
  10. Once all the panels have been installed, apply a bead of Altro sanitary sealant along the inside corners, abutments, penetrations and any exposed edges.
  11. On the side panels it may be necessary to use trims, A833 two-part start and edge trim or the one part start and edge trim G833.
Full spread adhesive application (see point 5)

For further information or technical advice
tel: 01462 707600
email: enquiries@altro.com

Altro Limited, Works Road, Letchworth Garden City, Hertfordshire SG6 1NW. Altro, Altro Whiterock and AltroFix are trademarks of Altro Limited.