Can't see the region you're looking for? You can find a list of our global locations here
Altro Transport products are designed for a long, trouble-free life, providing a higher degree of comfort and safety for your customers, easier maintenance for your staff, less downtime for replacement and repairs, and higher resale value. To obtain optimum performance from your Altro Transport flooring, careful consideration should be paid to the following:
Important: failure to install Altro Transport products correctly will affect the product guarantee.
Before installing Altro Transport products, carry out a vehicle inspection. Check the subfloor is properly fixed and all heavy overhead work complete. The area must be clear of all other trades.
Guidance, information and training are available from Altro as part of the Altro Assurance of Customer Satisfaction. Altro will work with your chosen adhesive manufacturer as required.
If the wood has been treated with insecticide or fungicide, allow it to stand for 30 days, or as recommended by the manufacturer, in a dry, warm atmosphere so that the treatment chemicals dry out completely. Note that an impregnated subfloor, i.e. plywood, is normally less absorbant than a non-impregnated one.
Degrease and abrade metal floors to remove all traces of corrosion and provide an effective key for the adhesive. The surface should be flat and smooth.
Abrade compound surfaces to provide a good key for the adhesive unless a two-component (reactive), epoxy or polyurethane adhesive is used.
Irrespective of the type of subfloor, surfaces must always be clean, smooth, dry and free from dust, dirt, oil, grease, and other contamination which may impair adhesion when the adhesive and flooring are applied. Vacuum cleaning is recommended.
It is important to check the subfloor for such problems as corrosion, moisture penetration and cracks and, if necessary, bring the subfloor up to a suitable standard. In certain instances the installation may benefit from the application of a suitable primer in accordance with the primer manufacturers instructions to achieve a successful bond.
Check you have the correct floor style and colour, plus enough flooring to complete the job. All pieces should be from the same batch (dye lot). Turn flooring sheets to get the best match. Pattern ranges of Altro transport flooring should be reverse-laid, i.e. the lengths are laid against each other in opposing directions (except the wood patterns) and will require the pattern to be matched from sheet to sheet and removal of selvedge, (for further information contact Altro). If there is any shade variation do not install, but call your Altro sales representative. Inspect stair trims and nosings (moldings) and install them in the correct order as some need to be installed before the flooring. Reverse Welded kits and/or rolls require visual inspection, with all jointed seams to be checked prior to installation. Do not install if visual defects are present. Claims against guarantee for colour, batch or obvious material defects will only be considered if the flooring has not yet been installed. Contact Altro Technical Services for further advice.
Altro Transport products must be stored and installed at a temperature of between 18°C and 27°C with a relative air humidity of between of 35% and 65% RH for at least 48 hours prior to, during and for at least 24 hours after completion.
Review floor plan or drawings and establish seam placement.
Lay flooring out on a flat, clean surface and allow material to ‘relax’ at the recommended installation temperature for a minimum of 2 hours. The surface temperature of the subfloor must not be below +10°C. Prior to installation, all material including adhesives and accessories should be allowed to reach room temperature. Cut pieces to necessary width and length, allowing about 25mm/1 inch extra at each end for trimming. In the case of ‘jig-built’ vehicles, where the floor area dimensions are constant, a template may be used. The material should then be back rolled or dressed before scribing in order to take out any tension in the product.
In circumstances where accurate blueprints can be provided, Altro can supply pre-cut kits and pre-welded joints to your specification. This can cut installation time and costs – contact your Altro sales representative for details.
With all types of adhesive, local environmental laws must be observed. It is the responsibility of the applicator to determine such law prior to proceeding.
Backing materials may vary. All Altro fleece backed products need to be installed whilst the adhesive is wet, however instructions may differ dependent on subfloor type.
Proper ventilation of the work area is essential where solvent-based adhesives are used. There must be no flames, incandescent or similar heaters or other ignition hazard, which could ignite the fumes from these highly-flammable products. In all cases, follow the adhesive manufacturer’s health and safety recommendations. Fleece backed products may require a double coat of adhesive when using contact adhesives due to the absorbency of the fleece.
Application of both types of adhesive is best achieved by spreading with a smooth or small notched trowel or by the spray method.
Apply adhesive to subfloor only, using a notched trowel which complies with the adhesive manufacturer’s instructions, observing requirements regarding “open time”, atmospheric temperatures, humidity and subfloor porosity.
The laying out and handling of reverse welded flooring should be taken into consideration as it can be irregular sized and shaped and be difficult to handle with the possibility of creasing and damage occurring.
Always follow the recommendations of the adhesive manufacturer, taking care to protect surfaces which should not receive adhesive
Before using any adhesive, users should refer to the MSDS (Material Safety Data Sheet) for correct safety advice and to determine the level of PPE (Personal Protective Equipment) and RPE (Respiratory Protective Equipment) that is required. A COSHH (Control of Substances Hazardous to Health) assessment and risk assessment should be carried out before using the adhesive. In the case of contact with eyes or skin, rinse immediately with plenty of water and seek medical advice.
For self-adhesive installations, avoid standing on the liner surface prior to installation and ensure that all liner material is disposed of appropriately and responsibly, so as not to cause a trip or slip hazard.
Whatever the application method or adhesive used, it is essential that every part of the floor covering is in contact with and bonded to the subfloor. This can be achieved by using a variety of simple accessories which are available through Altro directly or Altro distributors.
It is not recommended that mastic be used for sealing seams between vertical and horizontal surfaces. A mastic bond is not as effective as a weld and cannot be regarded as long term protection against water penetration. Some public vehicle builders use the “corner weld method”. Provided the weld is correctly executed, making a watertight seam, this can be an effective solution.
A 3mm groove, 2/3 of the depth of the material, must be cut evenly along each floor joint using a hand or automatic rotary grooving tool. With acoustic backed products, such as Altro Transflor Metris and Altro Transflor Sonis, care must be taken not to expose the foam backing and will require shallower grooving.
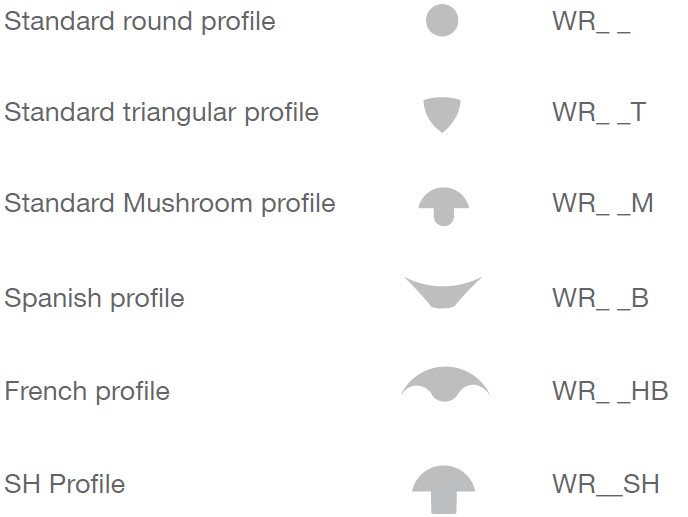
Different welding rod profiles have been developed to meet varying customer needs, including round, triangular, mushroom, Spanish, French and SH.
Ensure that there is no gap between one section of flooring and the next. Potentially, seams are the weakest points and most likely source of water ingress, causing the flooring to detach from the subfloor. The Altro heat welding method, correctly followed, eliminates this risk. Seams must be grooved and clear of debris before welding.
Clean hot air welding nozzle with wire brush. Turn gun on, set temperature to between 4-6 depending on local voltage and leave to heat for 10 minutes. Test weld on a scrap piece of flooring. Weld rod should fuse without burning or discolouring.
When heat setting is correct, cut the right colour of weld rod to the required seam length. Start at one end, put rod into nozzle and begin. Carefully move gun along seam at constant speed.
N.B. ensure fusion between the weld rod and floor covering on either side without leaving a gap beneath the rod. Such a gap results in a weak spot which is easily damaged and allows water to penetrate. If welding is too fast, rod will not fuse properly. Keep speed nozzle at right angles to the floor. Do not lean gun to left or right. You may need to weld half the length of the seam and trim off, then weld from the opposite end overlapping onto the trimmed weld at the centre.
Regulate heat and speed to make a “wake” on either side of the welding rod. If “wake” turns dark, lower heat setting, or go a little faster.
Grooving is not always needed where walls and floor form a natural 90 degree angle. Weld around wheel arches and verticals with mushroom or bus weld rod to avoid the need to trim or caulk (mastic). Round rod will require trimming.
Only when the weld rod has cooled should it be trimmed with a spatula. If excess rod is trimmed while hot, the weld will contract as it cools, thereby leaving a concave seam. On flat seams, trim weld rod in 2 stages.
Please contact Altro Technical Services for more advice.
All areas where the floor covering has been cut or is not continuous must be adequately sealed, including seat bolt holes. Where a watertight seal or joint is necessary, but the hot weld method is impractical, select a good quality waterresistant mastic, such as AltroMastic 100.
For AltroMastic 100 colours and installation information visit www.altro.com
Where physical damage is possible, from the frequent contact of luggage over seams, for example, the use of a mastic is no substitute for a weld and is not considered good practice. However, where a mastic is the only possible solution, use one which bonds chemically with the flooring, to avoid its being washed or worn away in use.
Fit flooring neatly in place. For a clean finish, protect adjacent surfaces with masking tape, exposing only the area to be sealed. Cut tube nozzle to allow 3mm / an eighth of an inch bead and insert tube into caulking (skeleton) gun. With steady pressure on trigger, move nozzle along channel, filling gap. Smooth AltroMastic 100 before it dries. Remove masking tape in 5-10 minutes. Curing takes 24-48 hours.
Every vehicle type uses specific, individual finishes and nosings (moldings). Each manufacturer has a unique nosing (molding). and installation procedure. For aluminium step nosing (molding) apply neoprene cartridge adhesive to one surface only. Press into place. Measure and drill holes, counter sinking for screws along top. Sweep up all debris.
Remove any adhesive on top of the flooring with a suitable wipe or solution.
N.B. Do not use ketones, acetones or other chemicals that will damage the flooring surface. Protect the flooring with non-staining type protection to ensure other trades do not damage the floor.
Altro Transport products do not require sealing, however sealing can be applied using AltroGloss 211 or equivalent emulsion. The application of a sealant affects the slip performance of the flooring and it is the responsibility of the owner to assess the level of slip performance required. Please contact your local Altro sales representative for more information.
Regular cleaning of Altro Transport products is essential. There are two cleaning cycles.
An ideal schedule uses both.
If in any doubt about any aspect of cleaning Altro Transport products, please contact your Altro sales representative. Please refer to the Altro Transflor cleaning guidelines which are available at www.altro.com.
The composition of cleaning agents varies widely. They may be designed to remove specific soilings, or be formulated with respect to health, safety and environmental issues or the needs of the flooring itself. Alkaline cleaners are best suited to the cleaning of buses and coaches as they generally deal with the majority of soils.
N.B. Use a twin compartment mop bucket or two buckets to keep clean and dirty water separate as good rinsing of residual dirt and cleaners is essential to prevent discolouring and reduction of slip resistance.
NOTE: “Altro Ltd” (“Altro”) endeavours to ensure that advice and information given in Product Data Sheets, Method Statements and Material Safety Data Sheets (all known as Product Literature) is accurate and correct. However, where Altro has no control over the selection of its products for particular applications, it is important that any prospective customer, user or specifier, satisfies him / herself that the product is suitable for the intended application. In this process, due regard should be taken of the nature and composition of the background / base and the ambient conditions both at the time of laying / applying / installing / curing of the material and when the completed work is to be brought into use.
However, as site conditions and the execution of the work are beyond our control, we accept no resultant liability.
Altro’s policy is one of continuous research and development and we reserve the right to update our products and information at any time without prior notice.