United Kingdom

United Kingdom

Construction
Transport
Construction
Transport

Samples basket

Altro Whiterock recessed shelf installation guide


Last edited: April 2021


The Altro Whiterock recessed shelf is vacuum formed from Altro Whiterock sheet and is designed to be heat welded flush within the sheet and not installed on to the surface (or overlapping) of the Altro Whiterock sheet.

In addition to the regular Altro Whiterock sheets and accessories, the following accessories and tools are required:

  • Matching Altro Whiterock weldrod
  • Jigsaw and a fine tooth blade (or similar such as multimaster, Dremel and a fine tooth blade)
  • Electric drill with 1/2” (13 mm) drill bit
  • Edge scraper
  • Pen for marking the protective film or pencil for the backside of the panel
  • Heat-welding gun with a 5 mm speed nozzle, Mozart trimming knife with guides
  • Soapy water and small paint brush
In a secure unit application, it is important to prevent the unit occupier locating hollow points within the construction of the unit. To prevent this it is advised that plywood is bonded to the back and the sides to encase the unit and give the impression it is a solid detail. This type of installation would need to be carried out in the stud work or unsupported areas to the back of the recessed unit, to eliminate weak areas. Alternatively the access point / area that the shelf is to be installed in to, should be constructed from a fully solid substrate that the recessed shelf can be bonded to.


  1. Use a datum line to determine the location on the wall substrate where the Altro Whiterock recessed shelf will be installed. Transfer these measurements to the sheet and trace the recessed shelf outer flange on to the backside of the sheet. It is recommended to mark the back of the sheet (in pencil only) and cut from the back to prevent scratching whenever possible.

  2. Drill a pilot hole(s) to get started cutting out the opening for the recessed shelf. This cut must be precise so care must be taken and like traditional Altro Whiterock welding a 1/16” (2 mm) gap should be left around the perimeter of the opening to allow for expansion of the sheets.

  3. Once the recessed shelf has been dry fitted and no more cutting is required, all edges to be heat-welded should be carefully beveled on both the sheet and the recessed shelf.
  1. There could be a slight variance in the thickness between the Altro Whiterock sheet and the recessed shelf and this is common with vacuum formed products. Thin shims may need to be used to obtain a flush finish along the heat-welded seam.

  2. It is recommended to heat weld the front side of the sheets first to ensure a flush finish once the welding is complete on the front of the sheet, flip the sheet over and weld the backside of the sheet to ensure a watertight finish.

  3. Apply soapy water or similar, to act as a lubricant, when trimming the excess weld rod, be careful not to get this into an un-welded area of the seam, as it will prevent the weld rod from fusing together.

  4. Apply adhesive to the back of the panel and the recessed shelf with a 5 mm x 5 mm square-notched trowel and install as per normal installation methods.

Do not proceed until mock-up installation has been approved.

Contact Altro technical services for more advice.


Dimensions

  • Total Size: 406 mm x 406 mm (16” x 16”)
  • Recessed Size: 254 mm x 254 mm (10” x 10”)
  • Depth: 102 mm (4”)
  • Thickness: 2.3 mm (0.09”)
  • Weight: 0.9 kg (2 lbs)

Recommended framing and support for Altro Whiterock recessed shelf

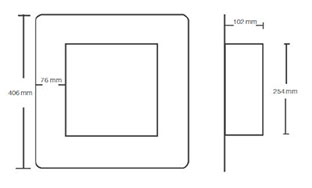
267 mm x 267 mm opening allows for a 6.35 mm (1/4") spacing around the 254 mm x 254 mm body of the recessed shelf


For further information or technical advice
tel: 01462 707600
email: enquiries@altro.com

Altro Limited, Works Road, Letchworth Garden City, Hertfordshire SG6 1NW. Altro, Altro Whiterock and AltroFix are trademarks of Altro Limited.